Microsoft Dynamics AX 2012 Manufacturing – Lean IoT Scenario Part 1: Functionality/Make to Order
Purpose: The purpose of this document is to illustrate a classic Make to Order Lean Manufacturing scenario in Microsoft Dynamics AX 2012 on simplified example when manufacturing motorcycles. This document will outline end-to-end functional flow for the scenario from initial setup all the way to Lean costing.
Challenge: Microsoft Dynamics AX 2012 out-of-the-box enables mixed mode manufacturing including discrete, process, project and Lean approaches. The goal will be to establish an end-to-end functional flow for Make to Order Lean Manufacturing scenario, better understand what it takes to do it. And then automate this scenario for the future use in a broader Lean IoT Demo scenario using IoT devices and the power of Microsoft Windows 10 IoT Core OS.
Solution: The simple but at the same time descriptive real-world example of motorcycles manufacturing provides a necessary context for better understanding of manufacturing processes and their implementation in Microsoft Dynamics AX. In particular we will be dealing with simple bill of materials which will consist of 2 components and straightforward production flow with 2 activities (one transfer and one process) to supply one of the components in order to implement Make to Order scenario.
For more detailed explanation of Make to Stock Lean Manufacturing scenario please refer to my earlier blog here: http://ax2012manufacturing.blogspot.com/2012/12/microsoft-dynamics-ax-2012_2.html
Walkthrough
In this scenario Motorcycle will be manufactured using Lean approach. Motorcycle components (Body and Wheels) will be assembled together in a work cell. But before this happens one of components (Wheels) will have to be supplied into Part location from General storage location by Water spider, once this happens Work cells worker will be able to pick a part from replenished Part location and use it for assembly. For the sake of simplicity another part (Body) is considered to be available for picking in its own location (the assumption is that it is available in on-hand inventory)
BOM
|
Production flow
|
<![if !vml]>
 <![endif]> <![endif]> |
<![if !vml]>
 <![endif]> <![endif]> |
Please note that the idea is to replenish Wheels from General storage location (Warehouse 11) into Part location (Warehouse 12). Body will be picked directly from its Part location (Warehouse 12). And the finished product AlexMotorcycle will be put into Finished product location (Warehouse 13). I used Warehouses instead of Locations (potentially within the same warehouse) only for the sake of clarity. Please see the diagram below for a visual explanation of the scenario.
Diagram
<![if !vml]> <![endif]>
 <![endif]>
On the visual diagram 3 Workcell workers work in their respective Work cells, and Water spider is helping them with replenishment of each Part location to support a continuous manufacturing process without extra distractions.
One of the requirements defined in this scenario is that all products are Standard cost controlled.
Section: Setup
Let's review the setup which is required to implement this scenario
We'll start with introduction of products for a finished good (AlexMotorcycle) and its components (Body and Wheels)
Released product: AlexMotorcycle

Released product: AlexMotorcycle – Default order settings

Please note that Default order type = Kanban
Released product: AlexMotorcycle – Site specific settings

Cost price for AlexMotorcycle is 3000$
Released product: AlexMotorcycle – Cost price

Production type = BOM
Released product: AlexMotorcycle – Production type (BOM)

First of AlexMotorcycle components is going to be Body
Released product: Body

Released product: Body – Default order settings

Released product: Body – Site specific settings

Cost price for Body is 2500$
Released product: Body – Cost price

Finally another component of AlexMotorcycle is going to be Wheel(s)
Released product: Wheel

Released product: Wheel – Default order settings

Released product: Wheel – Site specific settings

Cost price for Wheel is 250$
Released product: Wheel – Cost price

Now as we introduced all necessary Released products let's take a quick look at their list
Released products

Next step will be to introduce Resource groups
Resource group: AlexMotor

Please note that AlexMotor resource group will be a Part location which will be Replenished by the Water spider
Resource group: AlexMotor – Workcell capacity

We are going to need one more Resource group for this scenario
Resource group: AlexGeneral

Please note that AlexGeneral resource group will be a General storage location which will be Replenishing location for Water spider. By other words, Water spider will transfer parts from AlexGeneral location (Replenishing) into AlexMotor location (Replenished) to supply Work cell worker with required parts.
Now we'll define BOM structure for AlexMotorcycle
BOM – Designer view: AlexMotorcycle

BOM – Lines view: AlexMotorcycle
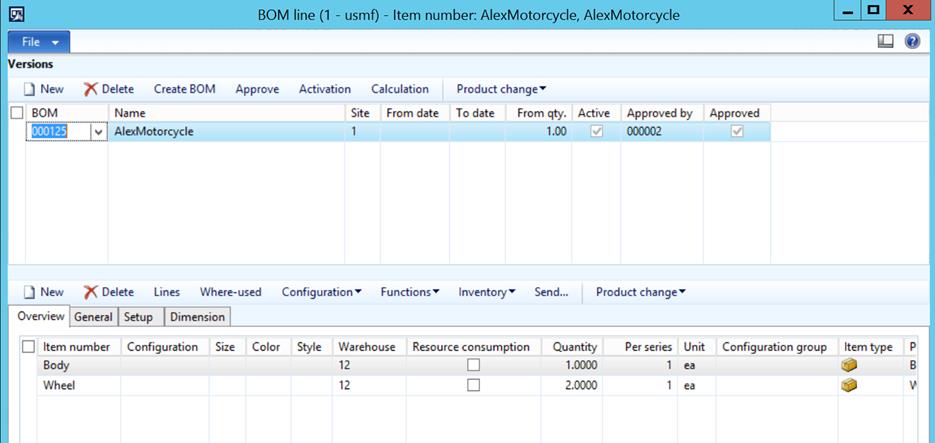
Please note that the consumption of components will happen from Warehouse 12. In the case with Wheels Part location (Warehouse 12) will first be replenished by Water spider from General storage location (Warehouse 11).
Then we can define Production flow model and production flow
Production flow model: AlexModel

Production flow: AlexMotorcycle

Production flow version details: AlexMotorcycle

Please note that I changed Takt unit = Hr
Then we'll run Activity generation Wizards to generate activities for Transfer and Process
Production flow: Activity = Replenish (Welcome)

Production flow: Activity = Replenish (New activity)

Production flow: Activity = Replenish (Create transfer activity)

Please note that Replenishing location is AlexGeneral and Replenished location is AlexMotor as it was described above
Production flow: Activity = Replenish (Assign transfer locations)

Please note that because I've selected Replenishing and Replenished work cells on the previous step, the appropriate Warehouse and Location settings where automatically populated for me based on Resource group (Work cell) data
Production flow: Activity = Replenish (Assign activity time)

Please note that I assigned 0.25 hr as Runtime activity time
Production flow: Activity = Replenish (Wizard completed)

This is how Replenish Transfer activity looks like
Production flow: Activity = Replenish

Production flow: Replenish – Activity details

Now we'll introduce the second Process activity which will represent assembly step
Production flow: Activity = Assembly (Welcome)

Production flow: Activity = Assembly (New activity)

Production flow: Activity = Assembly (Create process activity)

Production flow: Activity = Assembly (Assign picking activities)

Please note that component Wheel will be picked from its Part location (Warehouse 12)
Production flow: Activity = Assembly (Assign activity time)

Please note that I assigned 0.25 hr as Runtime for this activity
Production flow: Activity = Assembly (Wizard completed)

Now we can review a newly created activity
Production flow activity: Assembly

Next step will be to define a relationship between Transfer and Process activity because logically Transfer of necessary component(s) must take place before Process activity will begin
Create activity relation

Now we can review activity details
Production flow activity: Assembly – Activity details

At this point we'll be back to the Production flow to validate it
Validate

Infolog

After successful validation we can activate Production flow
Activate

Infolog

Now Production flow has been successfully activated
Production flow: AlexMotorcycle

At this point we can introduce Kanban rules which will drive kanbans creation
First we'll create Withdrawal Kanban rule to generate Withdrawal kanban to replenish Part location for Wheel(s)
Kanban rules - Withdrawal

Kanban rules – Withdrawal (Events)

Please note that Kanban line event = Automatic which means that if Kanban line requirement (for Wheels) in order to produce a finished good BOM, the appropriate kanban will be created automatically
Kanban rules – Withdrawal (Production flow)

Please notice Receipt location to be a Part location (Warehouse 12) as expected
Now we'll create Manufacturing Kanban rule to describe the actual assembly process
Kanban rules - Manufacturing

Kanban rules – Manufacturing (Events)

Please note Sales event = Automatic. This makes perfect sense because we are establishing a classic Pull-based Make to Order scenario, so when a new Sales order is placed this will automatically trigger a creation of Manufacturing kanban to produce a finished good
Kanban rules – Manufacturing (Production flow)

Please notice that Receipt location is a Finished good location (Warehouse 13) as expected
Now before we process with execution of this scenario we want to make sure that we have enough on-hand for Wheel(s) components in Warehouse = 11 (because we first need to transfer parts to Warehouse 12), and also Body components in Warehouse 12. I simply used Inventory adjustment journal to introduce necessary levels of on-hand
Posted journal lines

At this point we are ready to begin scenario execution
Section: Creation
We'll begin with placing a new Sales order for AlexMotorcycle
Sales order

Please note that AlexMotorcycle finished product is expected to be in a Finished good location (Warehouse 13). After we save Sales order the system based on Kanban rules in place will automatically create necessary kanbans. We can review created kanbans by opening Pegging tree form
Pegging tree

As you can see according to Kanban rules 2 Kanban jobs will have to be completed to produce AlexMotorcycle, one for Transfer and another one for Process
Pegging tree - Kanban

The following view shows that Transfer (Replenish) of Wheel part is required before Process (Assembly) may take place. You can clearly see it in Pegging details
Kanban

The view below shows what is necessary for Transfer to take place
Pegging tree - Kanban

Kanban

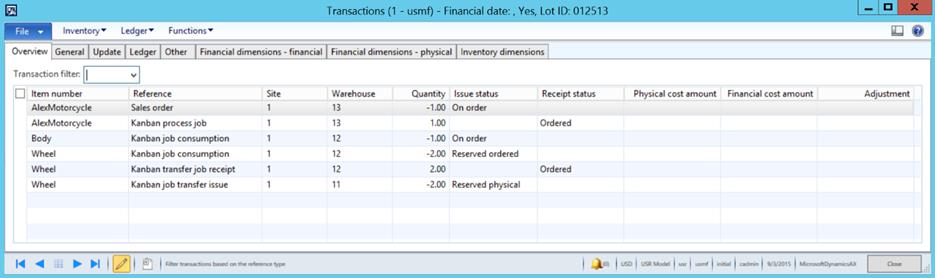
Let's take a quick look at Inventory transactions at this point
Inventory transactions

The next step will be to either manually plan or automatically plan Process activity. I'll do automatic planning by clicking "Plan the entire pegging tree"
Plan pegging tree

Now my kanban job shows status Planned as expected
Pegging tree – Kanban (Kanban jobs)

Then we are almost set to begin manufacturing activities
First we'll need to take care of the Transfer for Wheels, so we'll go ahead and launch Transfer jobs board
Transfer jobs board – Filter jobs

Here we'll see a Transfer job listed with its details
Transfer jobs board

Transfer jobs board – Tabs (Details)

Transfer jobs board – Tabs (Picking list)

Please note that because we've introduced enough on-hand for Wheels in advance Supply status indicates a green light for picking
Transfer jobs board – Tabs (Pegging)

Now let's check out Process jobs and we'll begin with launching Planning board to verify that Process job has been successfully planned for execution
Planning board – Workcell selection

Excellent, Process job is planned for one of days on the board
Planning board

Now we'll launch Process jobs board to see Process job there
Process jobs – Workcell selection

Process jobs board

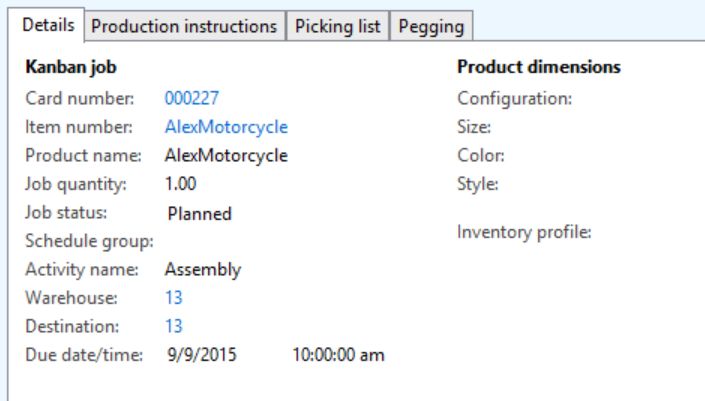
Process jobs board – Tabs (Details)
Process jobs board – Tabs (Production instructions)

Process jobs board – Tabs (Picking list)

Please note that Body is available for picking, but Wheels are not. This is because we haven't completed a necessary transfer yet
Process jobs board – Tabs (Pegging)

And Pegging details clearly indicated that there's Replenish Transfer activity to be done
Now let's take a look at Kanban details and please note how Kanban Process job is referencing Sales order on the screen below
Kanban – Source requirements details

One more composite view of Process job and associated Transfer job is presented below
Process jobs board

Now we can finally begin the execution of the scenario
Section: Execution
We'll begin with Starting Transfer job first
Transfer – Start

Here's how inventory transactions look like after this step
Inventory transactions
Then we'll complete Transfer
Transfer – Complete

Here's how inventory transactions look like after this step
Inventory transactions

As we complete Transfer now we have enough Wheels in its Part location for Workcell worker to begin Assembly process
Process job

And this is what we are going to do next. We'll do Prepare step now
Process job – Prepare

And again we'll take a look at inventory transactions
Inventory transactions

Then we'll start Process job
Process job – Start

And review how inventory transactions changed after this step
Inventory transactions

And finally we'll Complete Process job
Process job – Complete

And also review how it was reflected in inventory transactions this time
Inventory transactions

After we produced a finished good we can review on-hand inventory for AlexMotorcycle in Finished goods location (Warehouse 13)
On-hand

And because we have produced the product we can now send it to the customer
Sales order – Packing slip and Invoice

This is how inventory transactions will look like after we update Sales order Packing Slip and Invoice
Inventory transactions

The very last step will be to run Lean costing routine to cost the production flow
Section: Costing
Cost the production flow

Prompt

Please note that no further registrations of kanban jobs will be possible after the date costing, but that's fine for the sake of this demo
Now we can review the results of Backflush costing calculation
Backflush costing calculation

Standard cost transactions

Unused quantities

WIP Balances (Price calculation)

And take a final look at inventory transactions
Inventory transactions

Summary: In this walkthrough I illustrated how to establish a classic Make to Order Lean Manufacturing scenario in Microsoft Dynamics AX 2012. We went through the process of setting up data, creation of initial demand, manufacturing process and Lean costing. In the next parts I'll focus on how to use IoT devices and the capabilities of Windows 10 IoT Core OS to fully automate this functional scenario using the concept of "Intelligent" location and provide the environment for workers to solely focus of their manufacturing tasks in order to deliver the best quality products for customers.
Tags: Microsoft Dynamics AX 2012 R3, Lean Manufacturing, Pull, Kanbans, Kanban rules, Production flow.
Note: This document is intended for information purposes only, presented as it is with no warranties from the author. This document may be updated with more content to better outline the issues and describe the solutions.
Author: Alex Anikiev, PhD, MCP
Special thanks for collaboration in building this scenario goes to my colleague, Microsoft Dynamics AX Manufacturing expert, Dan Burke
Special thanks for collaboration in building this scenario goes to my colleague, Microsoft Dynamics AX Manufacturing expert, Dan Burke
Looking forward to Part 2... ;-)
ReplyDeleteIt just has arrived! :) Thank you, Jack! Will be publishing Part 3 soon too
DeleteNice post Alex :-)
ReplyDeleteYou are truly a magician.
I just added this feed to my bookmarks. I enjoy reading your posts. Thank you!
ReplyDeletehttp://spectoittraining.com/microsoft-dynamics-ax-2015-financials-online-training/
Thanks a lot nothing to say just want to tell you that your article is amazing
ReplyDeleteMs Dynamics ax Online training
reach Best Magnific MS Dynamics Training institute
Hey Alex
ReplyDeleteIf I'm correct, there are two types of Kanban, Manufacturing kanban and withdrawal kanban. Withdrawal kanban only created kanbans from a fixed location to another fixed location while the manufacturing kanban can create kanban picking work and kanban putaway. But with manufacturing kanban there is added value, so you'll need a BOM.
Isn't it possible to have a withdrawal kanban, creating picking work from all over the warehouse instead of a fixed location.
Actually, I'm looking for a solution where we have a large production order that requires for example 50 pallets of a certain component, but there is only space on the line to put 2 LP's. We are searching for a solution to bring a new LP to the line, when the stock is below a certain qty, and I was trying if Kanban had a solution for that problem.
Excellent blog post & thanks for sharing with us. To get more information about Microsoft Dynamics AX Support, Upgrade, Implementations, Visit at Microsoft Dynamics AX Manufacturing
ReplyDeleteHi Alex, you are not setting any data in the Work cell capacity section of the resources group. Isn't it required? What is the porpoise of that section?
ReplyDeleteMany thanks,
Héctor